
How to Build a Scratching Post
Ok! I think that we are ready to get started! I have included detailed instructions because I will assume that you know very little about working with wood, although this will not be the case with some of you. For those who are nervous about tackling this project, you may find it easier than you think after reading the instructions! If you are still nervous, how about enlisting a significant other to help?
Before we get started, you may be wondering why you just don’t go out and buy one from the local pet shop, especially after listening to the message from your accountant earlier in the day who stated that they were going to have to add an additional team of accountants to those who manage your assets in order to keep up with their exponential growth!
Well, I can think of lots of reasons to build a scratching post rather than buying one from a store, but I will just list three.
- The first and most important is that the height may not be appropriate for where you want the post to sit. Remember, cats like to watch birds! The perch on top of the post must not be too far beneath the window, nor should it be above the windowsill for safety reasons.
- The second is that if you make it, you will be able to select the color of the carpeting on the top (perch) and the base; otherwise, you will have to accept what the store has.
- Finally, for those who don’t have accountants working overtime managing their assets, it could be constructed for only a fraction of the cost of purchasing one.
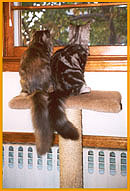
The photographs that you see below are the only photographs that you will need to make this post, being that it’s so easy! On the right is the completed post and on the left is the detail that shows how the post is mounted to the top and bottom, along with the wood bit used to recess the heads of the lag screws.

You will need the following materials for the post:
- Two pieces of scrap plywood or similar wood material, preferably ¾-inch thick for the top and bottom. Thinner wood would likely contribute to stability problems and would require shorter nails/carpet tacks, which may have a tendency to loosen and fall out.
- One length of 4-inch x 4-inch wood for the post. You might be able to find a scrap piece long enough at a Home Center for a very reasonable price. Use only the white lumber 4-inch x 4-inch posts used for indoor railings, etc., not the outdoor posts that are chemically treated.
- Sufficient carpet to cover the top and base. The carpet on top should be heavy so that it will feel soft and be strong enough to wrap around the corners to prevent their sharp edges from poking through over time. You are likely to find some remnants right in your home or apartment from the last time that you installed carpeting.
- Sufficient length of sisal rope, 3/8-inch in width to cover the entire post. You will likely need two 50 foot rolls of 3/8-inch sisal or one 100 foot roll.
- A small container of carpet adhesive.
- Miscellaneous hardware such as u-nails to secure the rope, washers, lag screws to fasten the top and bottom to the post, and carpet tacks.
Ok, now let’s do it!
First, cut the pieces for the top and bottom to the desired sizes. The only requirement is that the bottom should be at least 1/3 larger in length and width than the top for stability.
Next, mark both top and bottom in the center and drill four holes in both pieces for mounting them to the post. You will be using lag screws with washers for mounting the top and bottom to the post. Using a wood bit at least the size of the washer, drill into the wood only far enough so that the head of the bolt and washer will be flush with the surface of the wood; then, using a drill just wide enough to allow the lag screw to go through, drill another hole through the center of each. Please see the detail in the photograph, which shows an installed lag screw/washer, and an empty hole. The example shows only two bolts, but you want to use four for mounting the post, and three at a minimum so that it will not loosen up. The type of wood bit used to drill the recess is also shown in the photograph and it need only be as wide as the washer.
Prior to mounting the top and bottom to the post, the post must be prepared and tightly wound with the sisal rope. In order to simulate a round post and to insure that the rope could be tightly wound, you should round off each of the four corners with a plane until about ½-inch of wood is exposed on each planed surface. You do not have to be very accurate doing so, as the thickness of the rope will obscure minor irregularities. After rounding the corners, brush or spread a thin layer of carpet adhesive on the post to help keep it secure and tightly wind the rope on the post, using u-nails of a sufficient length to secure the sisal so that they will not pull out of the post after heavy use. If you are using 50 ft rolls, you will likely be using more than one roll, and you may use the u-nails for the splice.
Next, bolt the top and bottom to the post using at least the three (preferably four) lag screws with washers. You will want to drill pilot holes in the post to ease the installation of the screws and prevent the post from splitting. For the base, you may cover it with thin carpeting or a material of your choice, as long as it will not be able to be removed by your kitties. You may use scrap molding around the sides of the base, or wrap it with carpet if you wish. In order to protect your floors/carpet, you will want to also glue or nail) a “carpet protector” on each corner of the base.
The top should be covered with a heavy layer of carpet, as it will see the most use, as a location to sleep, as a perch, or diving board. A thin layer of carpet adhesive also will help to keep the carpet flat, and the adhesive will not harden and make it impossible to remove the carpet at a later date. You may cut into the corners of the top carpet piece in order to be able for it to be securely wrapped. It is most important that all four corners and wood surfaces be covered by the carpet to prevent injury, either from sharp edges or from splinters. The only portion of the top piece that is left exposed is that closest to the post on its underside. You must also use carpet tacks (5/8 or 3/4 inch) long enough so that they will not pull out over time. This is very important! A loose carpet tack could injure your kitty or you, should you step on one. You will definitely know it and possibly launch yourself into orbit and become another headache for NASA should you accidentally step on one. Finally, be sure that the length of the carpet tacks used do not penetrate the wood used and expose its sharp point on the other side. Usually, but not always, carpeting the top is the last act, and I suggest turning the post upside down after doing so, and letting it rest on it overnight allowing the carpet adhesive to set.
 And we are done! You may have looked at the photograph of the post very close and wondered why the photograph showed a post that appears to be perfectly round. Well, the reason is that it is perfectly round because a wood post was not used for it, but a length of 4-inch PVC pipe. I recommend using a wood post as described above, as it is far easier than using a length of PVC. Using the PVC, the process is similar, but it is tricky to secure the rope (especially a splice) on the PVC and makes it much harder to mount the top and bottom because a length of wood (2-inch x 3-inch) must be placed in the center of the PVC. Use of the post will also make it more stable, as there will be a larger wood surface to attach the top and bottom.
Finally, feel free to modify the post to suit your own specifications, but always think about safety. You must pay particular attention to insure that nails used do not penetrate the surface to the other side nor are they able to be pulled out by rough play.
Other than cleaning the top surface, such a post is maintenance free, and the only item that will need replacing after 3 or 4 years is the rope. The post in the photograph was made in 1996, and had to have a section of its rope replaced once.
Your kitties likely will take to the post without much or any training; otherwise, a bit of catnip rubbed on the rope part of it will help them to get scratching.
Disclaimer: Kathy Fatheree is not at all a medical expert. Contents of this web site are a collection of Kathy’s assist feeding experiences as well as the experiences of other cat owners who have assist fed their cats. While every effort has been made to ensure the accuracy of the information, Kathy Fatheree or anyone associated with this web site cannot be held responsible for anything that may happen as a result of using the information on this site.